
In the rapidly evolving world of software development, particularly within the robust Java ecosystem, the demand for high-quality, reliable, and maintainable code has never been greater. For developers building applications with Spring Boot, the de facto framework for creating stand-alone, production-grade Spring-based applications, a solid testing strategy is not just a best practice—it’s a necessity. This is where the powerful combination of JUnit 5 and Mockito comes into play, providing a comprehensive toolkit for crafting effective unit tests. A strong testing culture is a cornerstone of modern development, impacting everything from the latest Spring Boot news to developments in the broader Jakarta EE news landscape.
Unit testing focuses on verifying the smallest, isolated pieces of your application’s logic. However, these units rarely exist in a vacuum; they often depend on other components, like database repositories, external APIs, or other services. Bringing up these real dependencies for a simple unit test can be slow, complex, and unreliable. This is the problem that mocking solves. By using a framework like Mockito, we can create “fake” versions of these dependencies, allowing us to test our code in complete isolation. This article provides a comprehensive guide to mastering unit testing and mocking in Spring Boot, covering fundamental concepts, practical implementation, advanced techniques, and essential best practices relevant for developers working with anything from Java 11 to the latest Java 21 Long-Term Support (LTS) release.
The Foundation: Understanding Unit Testing and Mocking
Before diving into code, it’s crucial to grasp the core concepts that underpin our testing strategy. Understanding the “why” behind unit testing and mocking will make the “how” much more intuitive and effective. This foundational knowledge is a key piece of Java wisdom tips for any developer, whether they are self-taught or formally trained.
What is Unit Testing with JUnit 5?
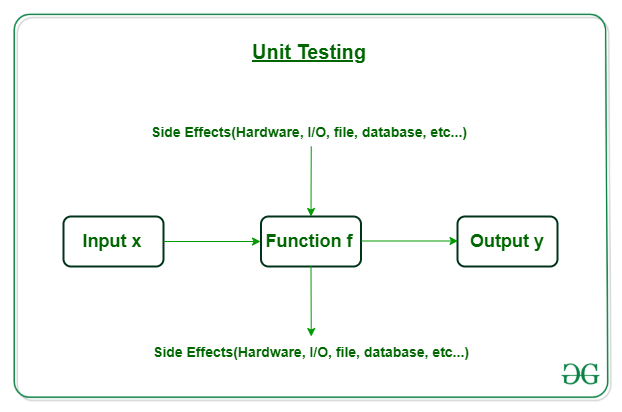
Unit testing is a software testing method where individual units or components of a software are tested. The goal is to validate that each unit of the software performs as designed. A unit is the smallest testable part of any software, often a method or a class. In the Java world, JUnit has long been the standard for writing tests. The latest major version, JUnit 5 (also known as JUnit Jupiter), offers a modular architecture and powerful features like extensions, parameterized tests, and dynamic tests, making it more flexible and extensible than its predecessors. The continuous evolution highlighted in JUnit news ensures it remains the top choice for Java developers. The primary benefits of unit testing are rapid feedback during development, simplified debugging by pinpointing failures to a specific unit, and encouragement of better, more modular code design.
Why Do We Need Mocking?
Consider a UserService that depends on a UserRepository to fetch user data from a database. To unit test a method in UserService, we don’t want to connect to a real database. Doing so would make the test an integration test, not a unit test. It would be slow, require database setup, and could fail due to network issues or data inconsistencies, not because of a bug in our service logic. Mocking allows us to create a simulated UserRepository. We can program this “mock” object to behave exactly as we need for a specific test case—for instance, to return a specific user when its findById method is called, or to throw an exception when a user is not found. This isolates the UserService, ensuring our test only fails if the logic within that service is flawed.
Introducing Mockito: The Premier Mocking Framework
Mockito is the most popular mocking framework for Java. Its popularity stems from its simple, clean, and highly readable API that uses a fluent style for defining mock behavior. The latest Mockito news often revolves around its excellent support for new Java features and its seamless integration with testing frameworks like JUnit 5. Spring Boot’s testing starter, spring-boot-starter-test, includes Mockito by default, making the setup process effortless. It allows you to create mocks, define their behavior (stubbing), and verify that your code interacts with them as expected.
Setting Up and Writing Your First Spring Boot Test
Let’s get practical. We’ll walk through setting up a simple Spring Boot project and writing a unit test for a service layer component using JUnit 5 and Mockito.
Project Dependencies with Maven

When you create a Spring Boot project, including the “Spring Web” and “Lombok” dependencies, the spring-boot-starter-test dependency is automatically included. It bundles all the necessary libraries, including JUnit 5, Mockito, AssertJ, and Spring Test. This is a great example of the streamlined dependency management discussed in Maven news and Gradle news. Your pom.xml will have this entry in the dependencies section:
<dependency>
    <groupId>org.springframework.boot</groupId>
    <artifactId>spring-boot-starter-test</artifactId>
    <scope>test</scope>
</dependency>
The Components Under Test
Let’s define a simple scenario. We have a NotificationService that depends on an EmailClient to send notifications. We want to test the logic within NotificationService without actually sending an email.
// The dependency we want to mock
public interface EmailClient {
    void sendEmail(String toAddress, String subject, String body);
}

// The service we want to test
@Service
public class NotificationService {

    private final EmailClient emailClient;

    public NotificationService(EmailClient emailClient) {
        this.emailClient = emailClient;
    }

    public boolean sendWelcomeNotification(String username, String email) {
        if (username == null || username.isBlank() || email == null || email.isBlank()) {
            return false;
        }

        String subject = "Welcome to our Platform!";
        String body = "Hello, " + username + "! Welcome aboard.";

        try {
            emailClient.sendEmail(email, subject, body);
            return true;
        } catch (Exception e) {
            // In a real app, you'd log this error
            return false;
        }
    }
}
Writing the Test with @Mock and @InjectMocks
Now, let’s write a unit test for NotificationService. We’ll use Mockito annotations to create our mock and inject it.
1. `@ExtendWith(MockitoExtension.class)`: This JUnit 5 annotation initializes Mockito mocks and enables the use of annotations like `@Mock` and `@InjectMocks`.
2. `@Mock`: This creates a mock implementation for the `EmailClient` interface.
3. `@InjectMocks`: This creates an instance of `NotificationService` and injects the fields annotated with `@Mock` (our `emailClient` mock) into it.
import org.junit.jupiter.api.Test;
import org.junit.jupiter.api.extension.ExtendWith;
import org.mockito.InjectMocks;
import org.mockito.Mock;
import org.mockito.junit.jupiter.MockitoExtension;

import static org.assertj.core.api.Assertions.assertThat;
import static org.mockito.Mockito.doNothing;
import static org.mockito.Mockito.verify;

@ExtendWith(MockitoExtension.class)
class NotificationServiceTest {

    @Mock
    private EmailClient emailClient;

    @InjectMocks
    private NotificationService notificationService;

    @Test
    void givenValidUserDetails_whenSendWelcomeNotification_thenEmailIsSent() {
        // Arrange
        String username = "testuser";
        String email = "[email protected]";
        String expectedSubject = "Welcome to our Platform!";
        String expectedBody = "Hello, testuser! Welcome aboard.";

        // We don't need to stub a return value for a void method,
        // but we can configure it to do nothing explicitly if needed.
        doNothing().when(emailClient).sendEmail(email, expectedSubject, expectedBody);

        // Act
        boolean result = notificationService.sendWelcomeNotification(username, email);

        // Assert
        assertThat(result).isTrue();
        // Verify that the sendEmail method was called exactly once with the correct arguments
        verify(emailClient).sendEmail(email, expectedSubject, expectedBody);
    }

    @Test
    void givenNullUsername_whenSendWelcomeNotification_thenReturnsFalseAndNoEmailSent() {
        // Arrange
        String username = null;
        String email = "[email protected]";

        // Act
        boolean result = notificationService.sendWelcomeNotification(username, email);

        // Assert
        assertThat(result).isFalse();
        // Verify that the sendEmail method was never called
        verify(emailClient, org.mockito.Mockito.never()).sendEmail(null, null, null);
    }
}
Advanced Mockito Techniques for Complex Scenarios
Simple stubbing is just the beginning. Real-world applications often present more complex testing scenarios. The latest Java SE news highlights how modern applications, especially those touching on reactive Java news or Java concurrency news, require sophisticated testing approaches. Let’s explore some of Mockito’s advanced features.
Verifying Interactions and Using Argument Matchers
Sometimes, you don’t care about the exact value of an argument passed to a mock, only that the method was called. Or perhaps an argument is a complex object that’s difficult to construct for an equality check. This is where argument matchers come in. Mockito provides a rich set of matchers in the org.mockito.ArgumentMatchers class, such as any(), anyString(), anyInt(), or isA(Class.class).
Important: If you use an argument matcher for one argument, you must use them for all arguments in that method call.
import static org.mockito.ArgumentMatchers.anyString;
import static org.mockito.ArgumentMatchers.eq;
import static org.mockito.Mockito.times;
import static org.mockito.Mockito.verify;

// ... inside a test class

@Test
void whenSendingNotification_thenCorrectEmailAndAnySubjectIsUsed() {
    // Arrange
    String username = "testuser";
    String email = "[email protected]";

    // Act
    notificationService.sendWelcomeNotification(username, email);

    // Assert and Verify
    // We verify the method was called once.
    // We care that the email is correct (using eq()), but we don't care about the subject or body.
    verify(emailClient, times(1)).sendEmail(eq(email), anyString(), anyString());
}
Handling Exceptions and Void Methods
Your code needs to be resilient. A crucial part of testing is verifying that your code handles exceptions from its dependencies gracefully. For methods that return a value, you can use when(...).thenThrow(...). For void methods, you use a slightly different syntax: doThrow(...).when(...).
Let’s test that our NotificationService returns false if the EmailClient throws an exception.
import static org.assertj.core.api.Assertions.assertThat;
import static org.mockito.ArgumentMatchers.anyString;
import static org.mockito.Mockito.doThrow;

// ... inside a test class

@Test
void givenEmailClientThrowsException_whenSendWelcomeNotification_thenReturnsFalse() {
    // Arrange
    String username = "testuser";
    String email = "[email protected]";

    // Stub the mock to throw an exception when sendEmail is called
    doThrow(new RuntimeException("Email service is down"))
        .when(emailClient).sendEmail(anyString(), anyString(), anyString());

    // Act
    boolean result = notificationService.sendWelcomeNotification(username, email);

    // Assert
    assertThat(result).isFalse();
}
Integration Slice Tests with `@MockBean`
So far, we’ve written pure unit tests. However, sometimes you need to test a component within a running Spring context, such as a REST controller. For these “slice tests” (e.g., using `@WebMvcTest`), you don’t want to load the entire application. The @MockBean annotation is the perfect tool for this. It tells Spring to find a bean of the specified type in the application context and replace it with a Mockito mock. This is a key feature highlighted in Spring news, as it dramatically speeds up tests for web layers, data layers (`@DataJpaTest`), and more.
Best Practices and Modern Java Considerations
Writing tests is one thing; writing good tests is another. Following best practices ensures your test suite is a valuable asset, not a maintenance burden. This is especially true as the Java platform itself evolves, with new features from projects like Project Loom (with its Java virtual threads news) and Project Valhalla set to change how we write concurrent and performant code.
Keep Tests Focused, Readable, and Independent
- One Logical Assertion Per Test: While not a strict rule, each test method should ideally verify a single logical concept. This makes it easier to understand what’s being tested and why a test failed.
- Descriptive Naming: Use names that describe the state, action, and expected outcome. A common pattern is
givenState_whenAction_thenExpectedResult(). - Arrange-Act-Assert: Structure your test methods clearly with these three sections. It makes the test’s purpose immediately obvious.
- Independence: Tests should not depend on each other or the order in which they are run.
Avoid Over-Mocking and Test the Behavior
A common pitfall is mocking too much. Don’t mock classes that you own and that don’t have external dependencies (like value objects or DTOs). Mocking every single dependency can lead to brittle tests that are tightly coupled to the implementation details. The goal is to test the behavior of your unit, not to replicate its internal logic in the test. Sometimes, using real objects for simple, state-less dependencies is better than mocking them. Another alternative to reduce mocking for null checks is applying the Null Object pattern news, a classic design pattern that remains relevant.
Leveraging Modern Java Features
The latest Java LTS releases, Java 17 and Java 21, introduced features that can make your test code cleaner. Use text blocks for large JSON strings in controller tests. Use records for immutable data carriers, simplifying test data setup. These small improvements, part of the ongoing Java ecosystem news, contribute to a more pleasant and efficient development experience, regardless of which JVM you use—be it OpenJDK, Oracle Java, or distributions from Adoptium, Azul Zulu, or Amazon Corretto.
Conclusion
Unit testing with JUnit 5 and Mockito is an indispensable skill for any modern Spring Boot developer. By mastering the art of isolating components and simulating dependencies, you can build more robust, maintainable, and reliable applications. We’ve journeyed from the fundamental concepts of unit testing and mocking to practical implementation with `@Mock` and `@InjectMocks`, and explored advanced techniques like verification, argument matching, and the strategic use of `@MockBean` for integration slice tests.
Adopting these practices will significantly improve your code quality and development velocity. As a next step, consider exploring integration testing with libraries like Testcontainers, diving into performance testing, or investigating how to test complex systems that leverage newer frameworks like JobRunr for background processing or AI integrations with Spring AI and LangChain4j. The world of Java is constantly advancing, and a strong foundation in testing is the best way to ensure your applications are ready for the future.